Holiday Lights in Brevard: Fall-Protection Basics at Home
By Space Coast Daily // September 17, 2025
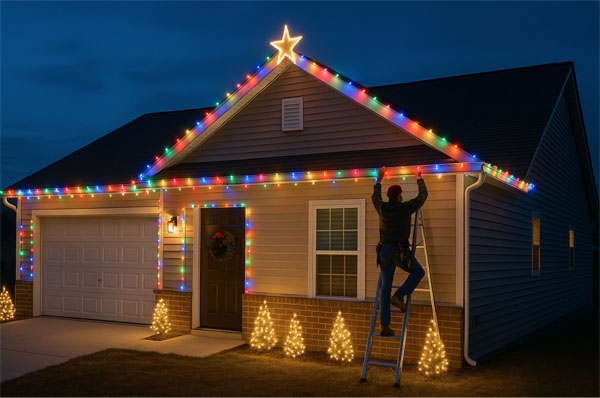
There’s nothing like a bright, festive display—until a slick shingle or wobbly ladder turns joy into a sprain, a shock, or a fire call. The aim here is simple: practical steps Brevard homeowners can use to get lights up, stay off the injured list, and keep the show running through New Year’s without drama.
Before you climb: plan, people, and weather
Give yourself ten minutes to map the job. Trace your route from outlet to eaves, decide where extension cords and clips will go, and choose a stable ladder location for each section. A spotter who can “foot” the ladder, hand up clips, and call timeouts when gusts kick up is worth their weight in eggnog. Since coastal squalls roll in fast, check a recent Space Coast Daily weather update to decide whether your window is breezy-but-fine or a slip waiting to happen; coverage like the Space Coast forecast with showers and thunderstorms likely helps you pick calm, dry hours rather than gambling on wet tiles after sunset.
If you’re using a condo balcony or a shared roof deck, skim your building rules first. Load limits, railing heights, and roof membranes vary. The fact that your neighbor hosted a party there last year doesn’t mean your ladder belongs up there today.
Gear that keeps you grounded
Footwear, gloves, and the right ladder beat bravado every time. Dry, grippy soles and snug gloves give you confidence you can feel. Match the ladder to the job so you’re not tempted to stand on the top rungs to reach the soffit. If you’ll work near roof edges or on a steep pitch, a simple harness with a temporary anchor and rope grab is inexpensive peace of mind. Even at home, arresting a slip beats riding it. A short skills refresher helps too—formal training such as a work-at-height safety course builds muscle memory for anchor checks, tie-off choices, and safe movement when your attention is split between footing and strands.
For wiring, stick to outdoor-rated cords, GFCI-protected outlets, and low-heat LEDs. Public agencies publish clear holiday safety guidance that’s easy to scan before you string the first light. It’s not just about “don’t overload a circuit.” Small choices—cord gauge, weather covers, drip loops—decide whether a light sprinkle becomes a nuisance or a hazard.
Set up and climb: the right way
Stable base, correct angle, and three points of contact are the trifecta. Plant the feet on firm ground and check the angle (about a 4:1 ratio). If the gutter dents with a thumb press, add a stand-off or rubber pads. Extend the rails two or three rungs past the roofline so you step through, not onto, the edge. Keep your buckle between the rails; if a reach feels long, climb down and bump the base six inches. One practice lap—up to the first bracket, back down, reposition—will reveal any bad geometry before fatigue does. If you want a deeper refresher on footing and common mistakes, ladder safety fundamentals lay out the basics in plain terms.
On a flat roof, pea gravel rolls under your boots and dew makes the membrane slick. Slow down. Keep your hammer and clips on a belt, not in your hands, and carry one strand at a time so you can see your feet. If a ridge or dormer forces a reach, stop and move the ladder—two extra minutes beats a bad step.
Electrical and roof edges: small habits that prevent big problems
Inspect every strand for cracked sockets, frayed insulation, or heat-damaged sections. Retire anything suspect; it’s cheaper than an ER copay or a roof patch. Use plastic light clips, not nails or staples—that way you won’t nick shingles or the underlayment. Keep cords clear of steps and the front walk; route them behind the downspout and door trim, and leave a little slack at each plug so a tug doesn’t pull it apart. Along the eaves, slow down, face your footing, plant both boots, then reach. Those tiny habits are why pros make it look easy.
If you’re threading lights along a balcony, trust railings for balance but not as a step stool. Don’t sit or stand on them to “get the shot.” Set tripod legs wide, keep the center column low, and orient one leg toward the rail so a bump pushes into the barrier rather than toppling over it. If the parapet is low, draw a mental line a full stride back. Your camera can lean; you shouldn’t.
Holiday lights in Brevard: when to call it and come down
Even pros pause for slick roofs, gusts, and lightning in the distance. If wind kicks up, reschedule the high spots and finish lower runs or yard displays. Dry air and brittle vegetation also increase fire risk; local headlines are a reminder that a “small” incident can escalate quickly, as when Palm Bay Fire Rescue responded to a residential fire earlier this year—a good cue to retire questionable cords instead of “making them work.”
One more Brevard-specific call: the Atlantic likes to throw curveballs well into December. The region’s hurricane-season vigilance coverage isn’t just storm talk—it’s a reminder to secure displays, protect plugs from wind-driven rain, and bring inflatables down early when fronts sweep through. A peaceful, grounded layout is more likely to survive that surprise squall intact.
DIY vs. hire a pro: where the line is
Most single-story rooflines and porch eaves are fine for a careful DIYer. Two common red flags: long, awkward reaches over driveways or landscaping you can’t protect, and steep or high roofs that push you onto top rungs or sketchy angles. If you need to anchor a harness but don’t know where sheathing ends and rafters begin, a trained installer is cheaper than a fall. Likewise for older homes with crumbly masonry at the parapet or flexible membranes that don’t love ladder feet. Nothing about a professional install prevents you from doing the creative part; you can sketch the design and let someone else handle the edges.
Case files from the neighborhood: two quick lessons
These are composites based on what local contractors and safety trainers see year after year. The details change; the lessons don’t.
In Indian Harbour Beach, a homeowner tried to drape lights along a second-story gable after a drizzle. The ladder felt fine until the last two steps, when rubber feet met smooth paint and dew. The slide was only a foot, but the instinctive sideways grab torqued the ladder and left a bruise that cut the job short. The fix would’ve been boring: wait an hour for dry conditions, add ladder mitts, and ask a neighbor to foot the rails.
Up in Rockledge, someone stretched a single long strand across a balcony and door, then propped the door half open with a shoe. It worked—until the family dog nosed the door, pinched the cord, and tripped the GFCI mid-party. No one was hurt, but the reset scramble in the dark wasn’t fun. A simple layout change—cords routed high and clipped, with slack and a drip loop—would have kept the party lit and the threshold clear.
Children, pets, and watch parties: manage the moving pieces
Kids and dogs don’t see tripping hazards the way you do. If you’re installing lights while a game plays inside, set clear ground rules: one helper on the ladder team, everyone else stays off the patio until the last clip clicks. During a watch party, dim path lights along the most common route and corral bags and shoes in one spot. A fifteen-minute sweep for spills, glass, and creeping cord loops saves you from the late-night “who moved that?” stumble.
If your layout crosses a sidewalk or common path, visibility and clearance matter as much as sparkle. Use short runs, tight clips, and tidy coils so pedestrians and pets don’t snag a surprise garland. Think of it as crowd control at micro scale.
Weather, power, and water: quiet guardrails that matter
Outdoor displays live in splash zones. Keep plug connections off the ground and sheltered, use covers rated for exterior use, and avoid daisy-chaining adapters. Coil and tape extra cord length so it can’t snag an ankle or wick water toward the outlet. Low, warm light helps guests move between the living room and deck without tripping, and battery lanterns remove the cord problem entirely. When wind is up, treat anything light as airborne—tripods, folding chairs, even small speakers tend to migrate right when you stop paying attention.
If your project includes a camera mount or a short reach beyond the parapet, training pays off. A concise work-at-height safety course gives you anchor basics and restraint habits you’ll rely on once a year for the next decade. It’s one of those investments that disappears into muscle memory but shows up when it counts.
After the first night: maintenance, takedown, and storage
Run the lights for ten minutes while you’re still outside and soberly inspect the whole route. Listen for buzzing, watch for flicker, and feel for plugs that run warmer than their neighbors. If a GFCI trips, don’t just reset; find the wet or pinched connection and fix it. Wind will work clips loose over time, so plan on a quick weekly scan after fronts pass.
Takedown deserves the same care. Don’t yank strands off the eaves like a magician pulling a tablecloth. Lift clips, coil cords loosely, and label bins so next year’s version of you won’t have to play guessing games with mystery tangles. A little order in the garage turns the 2026 install into a pleasant afternoon instead of an archeological dig.
A word on neighbors and building rules
A great view doesn’t trump quiet hours or access policies. Keep headcounts modest, cap the volume after the launch window or the neighborhood’s bedtime, and avoid crowding a common roof if your HOA bans gatherings. People remember considerate neighbors—and so do property managers.
Final check before you flip the switch
Walk the route one more time, tug-test clips, confirm GFCI buttons aren’t tripped, and ask your spotter to scan for cords creeping across thresholds. Turn the display on while you’re still outside and watch it live for a few minutes. If everything hums quietly and nothing glows hotter than it should, you’re good to cue the music.