Flux in MimicPC: A Simple Guide to Image Generation
By Space Coast Daily // November 24, 2024

Image generation with AI has been on a rocket ship in the last few years and Flux is one of the latest tools to come out of that. Flux is a state of the art tool to generate images by leveraging the power of many machine learning models.
With multiple models and the added bonus of being optimized for MimicPC Flux is perfect for both beginners and advanced users to generate high quality images without the hassle of traditional setup. In this blog we’ll go through getting started with Flux on MimicPC, from setup to generating and upsampling images and how MimicPC’s new pre-built workflows make using Flux and ComfyUI workflows even easier.
What is Flux and Why?
Flux is a tool built on machine learning models to generate images fast. By using neural networks optimized for generative tasks it allows you to generate art, illustrations and even realistic images with lots of detail. Flux has 3 main models: FP8 and FP16 Flux Dev Model, Schnell Model and Next-Gen Flux Model. Each model has its strengths so you can generate images for different artistic or practical needs, from speed and efficiency to high detail.
If you want to experiment with AI image generation in a simple and efficient way. MimicPC has a dedicated environment for Flux. With pre-configured nodes and fast GPU support you can skip the complex setup and just upload a prompt and generate images. The Flux workflow on MimicPC is further improved with the new Workflows page where you can choose the right workflow with just a few clicks.
Getting Started: Setting up Flux on MimicPC
To get the most out of Flux on MimicPC you need to install the model files and node packages. Here’s a step by step guide to set up your Flux workflow on MimicPC:
- Install Flux Models: Download the FLUX GGUF Model from Hugging Face. Choose the file size that fits your storage and quality needs and upload it to the u-net folder in the models directory.
- Add Node Packages for extra functionality: For extra compatibility install the GGUF, NF4 and X-labs node packages:
- GGUF Node Package: Copy the link and paste it into your custom-nodes folder.
- NF4 Node Package: Copy the link and paste it into the custom-nodes folder.
- X-labs Node Package: Copy the link and paste it into the custom-nodes folder.
- Install Loras for extra customization: Download Loras from Hugging Face and upload them to Lora’s folder on MimicPC.
- Download Control-Nets: Download HED, Canny and Depth Control-Nets from Hugging Face and save them in a folder inside X-labs directory called Control Nets.
- Add the Essentials Node: Finally open the Manager on MimicPC, go to “Install Custom Nodes”, search for “Essentials” and install the nodes for optimized functionality. After installation restart ComfyUI for all components to sync.
Flux vs ComfyUI: Which workflow to choose
The main difference between Flux and ComfyUI workflows is user control and customization. Flux is a simple workflow for beginners and those who want quick results. It balances quality and ease of use so it’s perfect for users who prefer pre-configured workflows without many custom settings.
ComfyUI is flexible and has advanced control. You can modify nodes, create custom workflows and adjust fine tuned parameters for a fully custom experience. This is better suited for those who have experience with image generation or for projects that require advanced modifications.
To clear an existing ComfyUI Workflow click “Clear” then follow these steps to set up a new Flux workflow:
- Add the “U-Net Loader”, “Dual Clip Loader”, “Load VAE”, “Flux Guidance” in the clip space.
- Add the “Clip text encode prompt” node for positive prompts and a duplicate for negative prompts.
- Add the “K-Sampler” and “VAE Decode” nodes for encoding, sampling and decoding.
- Connect each node to its corresponding component and save.
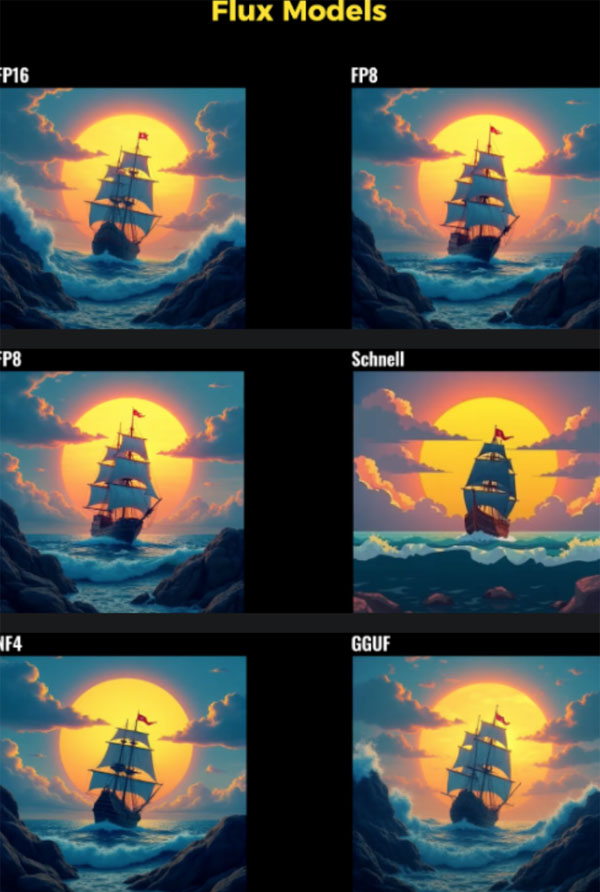
Choosing the right Flux Model and Parameters
The Flux model you choose will affect the output of your generated images. Here’s a quick guide:
- FP16: High detail but takes more time and memory to render.
- FP8: Balances quality and speed and requires less memory than FP16.
- Schnell: Fast results but slightly cartoonish output.
- NF4 and GGUF: Fast and decent quality, good for low memory setups.
For each model you can adjust the Guidance Value and CFG Value to fine tune the output:
- Guidance Value: 3.5
- CFG Value: 1.0 (or adjust to your project needs)
Text-to-Image with Flux
Flux makes text-to-image generation easy, you can produce amazing images from short prompts. Here’s how:
- CFG value: 1.0 and Guidance Value: 3.5
- Image size: 1024×1024 for best quality
- Enter your positive and negative prompts and click “Queue Prompt” to generate the image. With Flux FP8 you will get fast results with high detail.
Upscale Images with Flux
To upscale your image add these nodes to the workflow:
- “Clip text encode prompt” for encoding the text prompts.
- “Load Upscale Model” and “Ultimate SD Upscale” for resolution upscaling.
- “Save Image” to save the output.
Select an Upscale Model from the Manager, set the upscale factor to 2, CFG Value to 1 and scheduler to “Beta”. Connect the nodes and click “Queue Prompt” to upscale the image.
MimicPC’s New Workflows: One click solutions for creativity
MimicPC has released a dedicated page with many ready to use workflows, that simplify complex creative processes into one click solutions. The workflows cover a wide range of creative tasks from image editing to video generation so you can start your project right away without any setup.
MimicPC Workflows Features:
- Pre-Built Flexibility: MimicPC workflows come with all the necessary nodes, checkpoints and Loras so you don’t need to configure anything else.
- AI Optimized Hardware Options: Each workflow allows you to choose the best hardware for your task so you get maximum performance for even the most demanding projects.
- Multiple Workflows: Image generation, 3D modeling, e-commerce listings and more, each workflow is designed for different creative needs.
- 6 Step Setup: Apply a template, set hardware level, input your prompts or visuals and queue the project with one click.
These workflows remove the need to manually adjust JSON files and also allow you to save workflows as templates for later use. Coming soon a storage optimization feature will reduce file size by 75%.
Summary
Flux and MimicPC is a killer combination, making AI image generation easy and streamlined. With MimicPC’s ready to use workflows, whether you are a beginner or an expert, you can use Flux with just a few clicks, high quality upscaling, optimized workflows and one click creativity with the new Workflows page. Use these and start generating amazing images and let MimicPC’s setup do the rest of the work. The possibilities are endless and with MimicPC workflows AI has never been easier.