How to Upscale Anime Screenshots to 4K
By Space Coast Daily // March 4, 2026
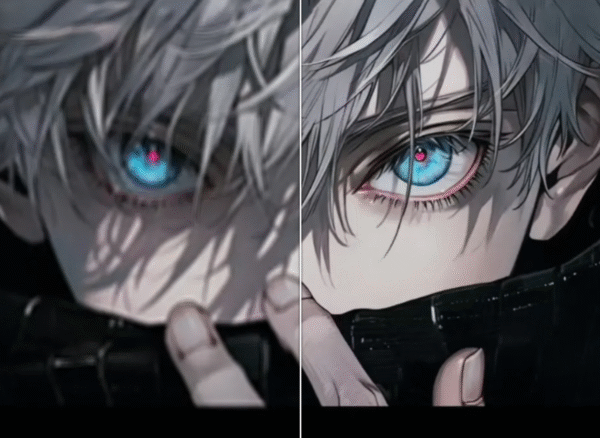
Anime is a stunning visual medium, known for its beautiful art, expressive characters, and dynamic action sequences. If you have a high-resolution 4K monitor, you naturally want to see your favorite anime moments in the best possible quality. The problem is that most anime isn’t produced in 4K, and screenshots often look blurry or pixelated when stretched to fit a large screen. Fortunately, you no longer need complex software to fix this. Modern AI tools make it simple to transform your favorite scenes into crystal-clear 4K wallpapers and images.
You can achieve this without any technical skills by using an online Image Upscaler that intelligently enhances your screenshots. These tools use advanced algorithms trained specifically on visual data, allowing them to add detail, sharpen lines, and increase resolution without creating the fuzzy results you get from traditional resizing methods. It’s a fast and effective way to breathe new life into your collection of anime images, making them perfect for any modern display. This guide will walk you through the entire process from start to finish.
Step-by-Step Guide to 4K Anime Upscaling
Creating a beautiful 4K version of an anime screenshot is a straightforward process. Follow these steps to get a sharp, high-resolution image ready for your desktop background or digital collection.
Step 1: Find the Best Possible Source Image
The quality of your final upscale depends heavily on the quality of your starting image. An AI can work wonders, but it gets the best results when it has more data to work with. Try to find a screenshot from a 1080p (Full HD) source, like a Blu-ray rip or a high-quality official stream. A 720p image can also work well, but avoid using low-resolution sources from old websites or heavily compressed social media posts, as they contain artifacts that get magnified during upscaling.
For the best results, save your screenshot as a PNG file. Unlike JPEGs, PNGs use lossless compression, meaning they preserve all the original pixel data. This gives the AI a cleaner image to analyze and enhance.
Step 2: Choose a Dedicated AI Upscaling Tool
Next, you need a tool to perform the upscale. While traditional photo editors offer resizing options, they rely on basic algorithms that simply stretch pixels, resulting in a blurry mess. An AI-powered tool, on the other hand, intelligently reconstructs the image by predicting what the missing details should look like.
There are many online platforms available that handle this automatically. Look for one with a simple interface that allows you to upload an image and select an output resolution. Some platforms also include a built-in AI Photo Editor to make further adjustments after upscaling is complete. This can be useful for tweaking colors or contrast to make the final image pop.
Step 3: Upload Your Anime Screenshot
Once you’ve selected a tool, the next step is to upload your screenshot. Most web-based upscalers have a clear “Upload Image” or “Choose File” button. You can either click this to browse your computer for the file or simply drag and drop the image file directly onto the webpage.
The platform will then load your image and prepare it for processing. This usually only takes a few seconds. Make sure you’ve uploaded the correct, highest-quality version of the screenshot you want to enhance.
Step 4: Select Your Upscaling Settings
After your image is uploaded, you’ll need to configure the settings. The goal is to reach 4K resolution, which is 3840×2160 pixels. Most AI tools offer a few ways to do this:
* Upscale Factor: You can choose to increase the image size by a specific multiplier, such as 2x, 4x, or 8x. If your source image is 1920×1080 (1080p), selecting a 2x upscale will double the dimensions to 3840×2160 (4K).
* Target Resolution: Some tools let you select a target resolution directly. If you see a “4K” or “3840×2160” option, choose that for the most direct approach.
* AI Model: Certain platforms offer different AI models for different types of images (e.g., “Anime,” “Standard,” “Photography”). If an “Anime” or “Digital Art” model is available, select it for the best results, as it has been trained to recognize and preserve the clean lines and cel shading common in anime.
For a 1080p screenshot, a 2x upscale is all you need. If you start with a 720p (1280×720) source, you will need a 3x upscale to get close to 4K resolution.
Step 5: Process and Download Your 4K Image
With your settings confirmed, click the “Start,” “Process,” or “Upscale” button to begin the enhancement. The AI will analyze your image and generate a new, high-resolution version. This process can take anywhere from a few seconds to a minute, depending on the tool’s server load and the image’s original size.
Once the processing is finished, the tool will show you a preview of the upscaled image. You can often compare it side-by-side with the original to see the dramatic improvement in clarity and detail. If you’re happy with the result, click the “Download” button to save the new 4K image to your computer.
Tips and Best Practice
Following the steps above will give you great results, but these extra tips can help you achieve a truly professional-quality upscale.
* Batch Process Your Images: If you have a folder full of screenshots you want to upgrade, look for a tool that offers batch processing. This feature allows you to upload and upscale multiple images at once, saving you a significant amount of time.
* Look for Denoise and Artifact Removal: Low-quality anime sources can sometimes have digital noise or compression artifacts. Some advanced AI upscalers include features to clean these up automatically during the enhancement process. Enabling this can result in a much cleaner and smoother final image.
* Adjust Colors and Brightness Afterward: While upscaling improves resolution, it doesn’t change the color balance. After downloading your 4K image, you can use a basic photo editor to make minor adjustments to brightness, contrast, and saturation to make the artwork more vibrant.
* Avoid Over-Upscaling: It can be tempting to upscale an image by 8x or even 16x, but this can sometimes lead to unnatural-looking results. Stick to the multiplier needed to reach your target resolution (e.g., 2x for a 1080p source to get 4K). Pushing the AI too far on a very small source can introduce strange textures or distorted lines.
Common Mistakes to Avoid
Getting the perfect upscale also means knowing what not to do. Here are a few common mistakes that can lead to poor results.
* Using a Screenshot of a Screenshot: Every time an image is saved as a JPEG, it loses some quality. Avoid taking a screenshot of an image you already have saved. Instead, use the original file to ensure the AI has the most data to work with.
* Ignoring the Aspect Ratio: Make sure your source screenshot has a standard aspect ratio, like 16:9. If you crop it to an unusual shape before upscaling, it may not fit your 4K monitor correctly without being stretched or having black bars.
* Expecting Perfection from Very Old Sources: AI is powerful, but it can’t create detail that was never there. If you’re upscaling a screenshot from a 480p anime from the early 2000s, the result will be much better than the original, but it won’t look like a modern Blu-ray. Set realistic expectations based on your source.
* Forgetting to Check the Final File: After downloading, always open the image and check its properties to confirm it’s at the correct resolution (3840×2160). Also, zoom in to 100% to inspect the details and ensure there are no strange-looking AI artifacts.
Conclusion
Upscaling your favorite anime screenshots to 4K is an excellent way to celebrate the artistry of your favorite shows on a high-resolution display. What was once a complicated task requiring expensive software is now accessible to everyone through simple and powerful AI tools. By starting with a good source image and following a few easy steps, you can turn any screenshot into a stunning, wallpaper-worthy masterpiece.
The clarity and detail you can unlock will make you appreciate the animation on a whole new level. Give it a try and see how incredible your favorite anime moments can look in full 4K glory.