
Recycle Bin Recovery on Windows: Restore Deleted Files and Videos Quickly and Safely
By Space Coast Daily // July 18, 2026
Deleted Something by Mistake? How to Get It Back from Recycle Bin on Windows
You hit delete and moved on with your day, only to realize later that the file was still needed. Maybe it was a folder of client videos, a tax document, or years-old family photos. But to your horror, the Recycle Bin is empty. Though you never emptied it.
So what happened, and is Recycle Bin recovery still viable on Windows 10/11? Don’t worry. This guide explains why files vanish from the Recycle Bin and the fastest ways to recover them.
Key Takeaways
• Recycle Bin recovery is viable if you act quickly and avoid writing new data to the affected drive.
• Check the Recycle Bin, backups, and cloud storage first before using recovery software.
• If you don’t have a backup, a recovery tool can restore files deleted with “Shift + Delete” or from emptied Recycle Bins.
• Prevent future data loss by increasing Recycle Bin size, enabling backups, and avoiding unnecessary Shift + Delete operations.
Part 1: What Happens When Files Go to Recycle Bin
When you delete a file from your PC’s internal drive, Windows usually doesn’t erase it immediately. Instead, it moves the file to the hidden $Recycle.Bin folder, with a separate Recycle Bin for each user account.
The Recycle Bin has limited storage. Once it’s full, Windows automatically removes the oldest deleted files to make room for new ones, so files deleted long ago may no longer be recoverable.
Not all deleted files go to the Recycle Bin.
Files deleted from USB drives and memory cards are typically removed immediately. While files larger than the Recycle Bin’s size limit may be permanently deleted with a “file is too big to recycle” warning. Knowing these limits helps determine whether you can restore a file from the Recycle Bin or need a Windows file recovery tool.
Part 2: Common Reasons Files Disappear from Recycle Bin
Here are the most popular reasons why files disappear from the Recycle Bin:
• Recycle Bin emptied: The Recycle Bin was manually emptied by you, another user, or a cleanup tool like Storage Sense.
• Shift + Delete used: The file bypassed the Recycle Bin and was deleted immediately.
• Storage limit reached: Windows automatically removed older files when the Recycle Bin became full.
• Deleted from a removable drive: Files on USB drives, SD cards, and most external drives usually skip the Recycle Bin.
• Cleanup software: PC optimization or antivirus tools may have automatically cleared the Recycle Bin.
• System reset or crash: A system crash, reset, or Windows reinstall may have erased the Recycle Bin and its contents.
Part 3: How to Recover Deleted Files from Recycle Bin on Windows
Before trying any of the fixes below, stop saving new files, installing programs, or downloading anything to the affected drive. Every new write is a chance for the system to overwrite the very sectors where your deleted file exists, and once that happens, no software can bring it back. Afterward, follow the fixes below according to your situation to recover deleted files from Recycle Bin:
Fix 1: Restore Directly from Recycle Bin
If the file is still in the Recycle Bin, here’s how to retrieve deleted videos from Recycle Bin, or other file types:
Step 1: Open the Recycle Bin. Then, locate the file (use the search bar or sort by “Date deleted” if the bin is full of items)
Step 2: Right-click the file. Next, select “Restore.” Windows will automatically put it back in its original folder.
Step 3: To recover multiple items at once, hold “Ctrl” while selecting each file. Then, right-click and pick “Restore.”
Note: If you can’t find the file, it means the bin has either been emptied or the file was deleted in a way that skipped it. In that case, move to Fix 2.
Fix 2: Use Professional Recovery Software for Emptied Bin
When a file is no longer in the Recycle Bin, it usually still exists on the disk. Windows just marks the space they occupy as available for reuse. That’s where you can employ 4DDiG Data Recovery, the best software to recover Recycle Bin deleted data.
It’s built specifically for scenarios such as an emptied bin, Shift + Delete removals, formatted drives, and even files lost to corruption or a failed drive. Here’s what makes 4DDiG useful for Recycle Bin-specific recovery:
• Wide Compatibility: Supports 2,000+ file types across HDDs, SSDs, USB drives, SD cards, and NAS devices.
• Deep & Quick Scan: Scans disk sectors to recover deleted files, even after the Recycle Bin has been emptied.
• Recover While Scanning: Restore files as soon as they’re found without waiting for the scan to finish.
• File Preview: Preview photos, videos, and documents before recovering them.
• AI Video Repair: Fixes corrupted recovered videos, including footage from Canon, Sony, DJI, and GoPro devices.
Step-By-Step Guide to Use 4DDiG:
Follow the steps beneath to restore deleted videos from Recycle Bin on Windows 10/11 or other file types with 4DDiG:
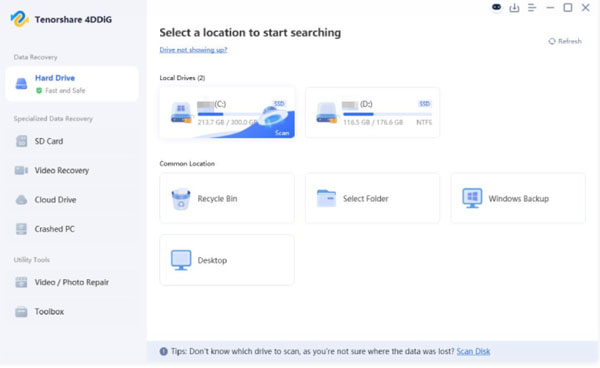
Step 1: Select the drive:
Launch 4DDiG and select “Recycle Bin” as the location to retrieve files. You can pick the file types to scan.
Step 2: Run a deep scan:
4DDiG automatically scans the “Recycle Bin” for recoverable files. You can pause the scan and resume later if needed, and recovered items appear progressively rather than only at the end.
Step 3: Preview recoverable files:
Once scanning identifies your videos, photos, or documents, use the built-in preview to confirm they’re intact before restoring. This is especially useful for checking that recovered videos and photos aren’t corrupted.
Step 4: Restore to a safe location:
Select the files you need, then click “Recover” to save them to a different drive than the one you scanned. Restoring to the original drive risks overwriting other recoverable data.
Fix 3: Check Backup and System Restore Options
If the file was part of a larger folder structure, backups and system tools are worth checking too for Recycle Bin recovery:
• File History (if enabled): Open “Restore your files with File History” from the Start menu, browse to the original folder, and use the arrows to restore an earlier version containing your file.
• Previous Versions: Right-click the parent folder. Choose “Properties.” Tap “Previous Versions.” Then, restore a snapshot if one is available.
• Cloud Backup: Check the recycle bin or version history in OneDrive, Dropbox, or iCloud. Many services keep deleted files for 30 days or more.
• System Restore: Doesn’t recover personal files directly. It restores system settings from separate snapshots, not Recycle Bin data, and is mainly useful if the deletion occurred alongside a broader system issue.
Part 4: How to Avoid Losing Files from Recycle Bin Again
Once you’ve recovered your files, taking a few simple precautions can help prevent the same problem from recurring. The tips below can reduce the risk of permanent data loss and make file recovery much easier if you ever need it again:
• Increase Recycle Bin Size: Head to “Recycle Bin.” Choose “Properties.” Tap “Custom size” and raise the limit to reduce automatic file purging. (1,024 MB = 1 GB.)
• Enable Backups: Turn on “File History” or scheduled backups for important folders.
• Protect Removable Drives: Enable the Recycle Bin for USB drives and SD cards if you use them frequently.
• Avoid Shift + Delete: Use it only when you’re sure, as it bypasses the Recycle Bin.
• Install Recovery Software Early: Employ a tool like 4DDiG Data Recovery, installed before data loss, to avoid overwriting deleted files during installation.
• Check Cleanup Tools: Review the settings in third-party cleanup software to prevent automatic deletion of the Recycle Bin.
Final Words
Recycle Bin recovery is viable by checking the bin, then trying File History or cloud backups. If those don’t work, recovery software offers the best chance of restoring your files before they’re overwritten.
For emptied Recycle Bins, or formatted or corrupted drives, 4DDiG Data Recovery is a comprehensive option that combines deep scanning, file preview, selective recovery, and AI-powered repair. If you’ve just lost a file, stop using the affected drive and scan it with 4DDiG as soon as possible to maximize your chances of recovery.